How we do our lens tests
The first thing we do when we receive a lens for reviewing is to put it on a camera and use it! That may seem obvious, but we do actually put it on a camera and use it for it’s intended purpose in order to get a feel for the lens and how it works long before we put it through the full test procedure. This has a couple of advantages when it comes to the actual test in that we have an idea of how the lens performs and an inkling of what to look for, or more closely at.
Having used the lens on at least a couple of occasions, we then set it up and take a number of shots of a test target under as controlled conditions as possible. Lenses under 300mm in focal length are set up indoors at a minimum of 25 times the focal length from the target. Two 500w Interfit 3200 lighting units light the target at 45º. The lens is fitted to the camera and mounted on a Manfrotto 055 tripod and a 468RC2 Proball head.
Lenses over 300mm are set up out of doors with as even lighting as available, avoiding strong sunshine. Shots are taken with the self-timing mechanism.
A series of photographs are taken of parts of the target, normally two for each full aperture at each focal length. For an f/2.8 zoom lens that stops down to f/32 this can be as many as 48 individual shots. The area or region of interest of the target that we shoot complies with the ISO 12233 slant edge test.
Testing lenses for DSLR’s is not such a simple task as it was in the days of 35mm film, due to the variety of sensors fitted to the cameras.
After some searching, we found a program that is designed to compare not only lenses, but digital cameras as well. The program is Imatest software. There are many parameters measured by this system, but in order to produce results that were easily assimilated we settled on the measurement of cycles per pixel. Although these measurements can be taken at a number of levels (MTF10, MTF30, etc) we settled on the rather conservative level of MTF50 as this is the finest point at which the eye can detect sharpness. The measurement is also uncorrected, a better method of testing the lens rather than the camera it is mounted on.
The files are converted from the RAW that they are captured in without any sharpening applied and saved as jpg’s. It is these files that are then run through the Imatest software to achieve the figures we present to you in graph form. At the time of writing we have put over 20 lenses through this system, Lenses of the same marque and repeat runs have been carried out to ensure a consistency and accuracy of results. It should be noted however, that results are only relevant to the camera/sensor combination that the test was carried out on!
Two shots are then taken with prime lenses, or four with zoom lenses (each end of the zoom). These are the scene shots that are included with the review. One scene is shot with the lens wide open, the other with the lens stopped down to f/8.
Between these items of information, which include the reviewer’s opinion of the lens as well, it should give you enough information to help you make up your mind about the suitability of the lens for your purposes. The tests though, provide no warranty as to the suitability of the lens for that purpose and variations do occur in the manufacturing process that may affect the performance of your individual model.
More information about Imatest software may be found here Imatest software
| An example of the graphs Higher readings are better Edge is approx 75% of the distance from the centre to the corner. 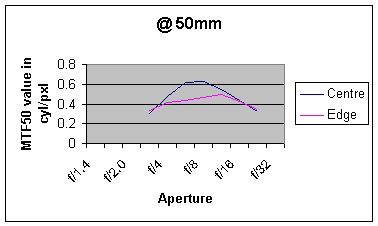 | The target used for testing |
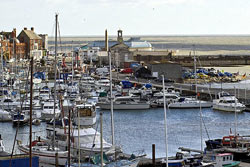
 | This view is always taken with the lens wide open. In the tests, it ca be clicked on to open full size in a new window. The view can be used to assess distortions as well as sharpness wide open. It will always be approximately the same size as the viewing position is varied. With zoom lenses there will be an example of this view at each end of the zoom range. |
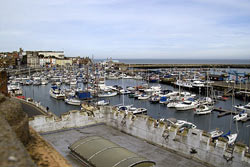 | This view again will be openable at full size and is always taken at f/8. In this case the viewing position is fixed and will give you an idea of the angle of view the lens gives. With zoom lenses, there will be an example of this view at each end of the zoom range. This one is at 18mm on an SD10 (1.7x crop) |
 |  |
This one is at 70mm on an SD10 (1.7x crop) | This one is at 200mm on a Canon 1D (1.3x crop) |
The only post processing that these images have is auto-levels and sharpen in Photoshop 7.
The tripod used has been upgraded to a Manfrotto 055ProB and the head to a 468MG RC4.
The Imatest software has been upgraded and split into two versions, Amateur and Pro. We now use the latest pro version (currently 1.6.16 PRO)
This includes a distortion module that will give a figure for the distortion and a shot is taken of a grid to assess this. One at each end in the case of a zoom. The figure is a percentage of the amout a straight line 'bends' across the width of the frame, minus figures being barrel distortion and positive figures being pincushion distortion. At +/- 1.5% the bend starts to become noticeable.
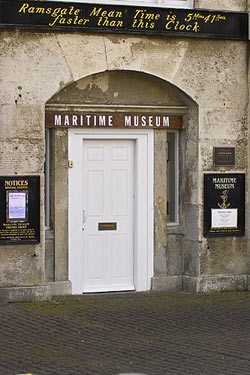
The Maritime Museum door has had a number of items of street furniture placed in front of it, including a bus stop, precluding shooting it with longer lenses, so an alternative 'target' has been found, that of a church window with plenty of detail in the flint work to study.
It is probable though, that the Door will still be used for shorter focal length lenses.
Ian
In addition, your outdoor, wide-open image would be more helpful if it contained more detail in the corners (instead of rather featureless stone), and if you also gave us the same scene perhaps 2 stops down and at f/8.
kind regards
Tony Margiocchi
Add your message
Please login here or if you've not registered, you can register here. Registering is safe, quick and free.
photodo Stats
428 MTF tests
74 in-depth photodo reviews
100+ users join each day
Help the lens community by reviewing or rating a lens today via our lens search

Latest Lens Reviews
- Chinon 28mm f/2.8 Vintage Lens Review
- Canon EF 70-200mm f/4L IS II USM Lens Review
- Samyang AF 85mm f/1.4 EF Review
- Sigma 70mm f/2.8 DG Macro Art Review
- Samyang AF 24mm f/2.8 FE Review
- Meike 50mm f/1.7 Review
- Tamron 70-210mm f/4 Di VC USD Review
- Lensbaby Burnside 35mm f/2.8 Review
- Asahi Super Takumar 50mm f/1.4 Review
- Asahi Super-Multi-Coated Takumar 135mm f/3.5 Review